Measuring Functions
Selecting/Changing Measuring Function
In the function menu, you can find the following functions
- Length measurement
- Continuous measurement
- Area measurement
- Volume measurement
- Indirect distance measurement
- Indirect height measurement
- Double indirect height measurement
- Indirect length measurement
- Wall area measurement
- Stake-out function
- Grade measurement/digital spirit level
- Memory function
- Press button (7)
 to open the Functions menu.
- Use button (3)
 or button (8)
  to select the required measuring function.
- To confirm the selection, press button (7) or button (2)
 .
.
Length Measurement
- Press button (7) to open the Functions menu.
- Select the length measurement
 and confirm the selection with button (7) .
- Briefly press button (2) to switch the laser on.
- Press button (2) to start the measurement.
- The measured value will be shown at the bottom of the display.
- Repeat the above-mentioned steps for each subsequent measurement.
- The last measured value is at the bottom of the display, the penultimate measured value is above it, and so on.
Continuous Measurement
During continuous measurement, the measured value is continually updated. You can, for example, move a required distance away from a wall while reading off the current distance at all times.
- Press button (7) to open the Functions menu.
- Select continuous measurement
 and confirm the selection with button (7) .
- Briefly press button (2) to switch the laser on.
- Move the measuring tool until the required distance is shown at the bottom of the display.
- You can interrupt the continuous measurement by briefly pressing button (2) .
- The current measured value will be shown at the bottom of the display. The maximum and minimum measured value appear above it.
Area Measurement
- Press button (7) to open the Functions menu.
- Select area measurement
 and confirm the selection with button (7) .
- Briefly press button (2) to switch the laser on.
- Press button (2) to start the first measurement, e.g the length of a room.
- Press button (2) to start the second measurement, e.g. the width of a room.
- After the second measurement has been completed, the area will be automatically calculated and displayed. The end result is shown at the bottom of the display, while the individual measured values are shown above it.
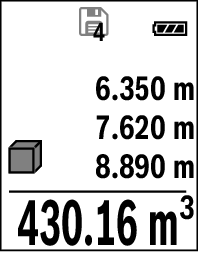
Volume Measurement
- Press button (7) to open the Functions menu.
- Select volume measurement
 and confirm the selection with button (7) .
- Briefly press button (2) to switch the laser on.
- Press button (2) to start the first measurement, e.g the length of a room.
- Press button (2) to start the second measurement, e.g. the width of a room.
- Press button (2) to start the third measurement, e.g. the height of a room.
- After the third measurement has been completed, the volume will be automatically calculated and displayed. The end result is shown at the bottom of the display, while the individual measured values are shown above it.
Indirect Distance Measurement
Indirect distance measurement is used to measure distances that cannot be measured directly because an obstacle would obstruct the laser beam or no target surface is available as a reflector. This measuring procedure can only be used in a vertical direction. Any deviation in horizontal direction leads to measuring errors.
Indirect distance measurement is always less accurate than direct distance measurement. For application-related reasons, measuring errors can be greater than with direct distance measurement. To improve the accuracy of measurement, we recommend the use of a tripod (accessory).
The laser beam remains switched on between the individual measurements.
For indirect distance measurements, three measuring functions are available. Each measuring function can be used for determining different distances:
- Indirect height measurement
- Double indirect height measurement
- Indirect length measurement
Indirect Height Measurement
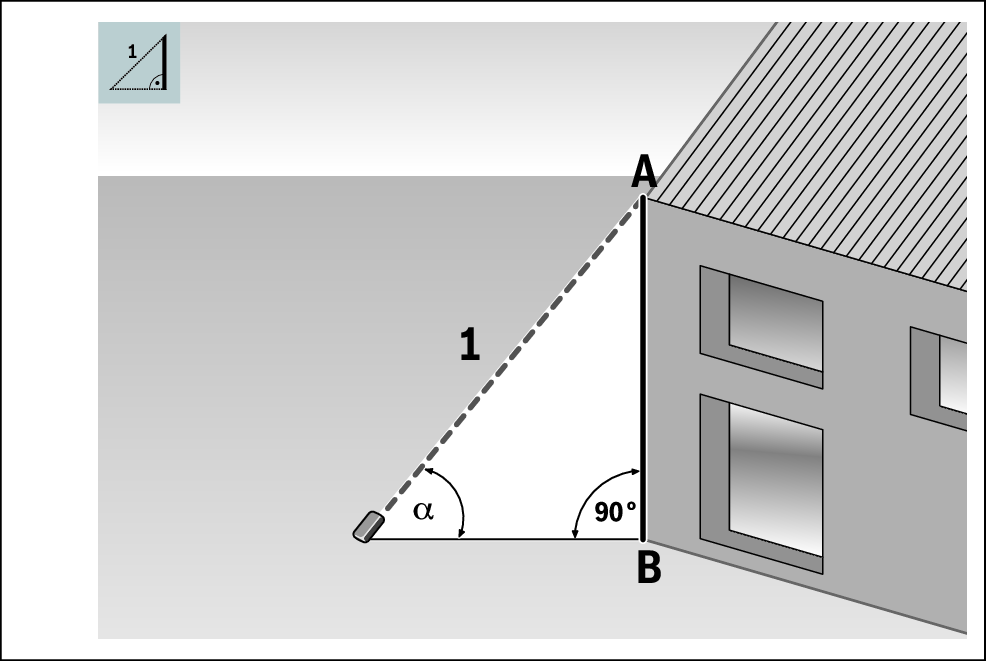
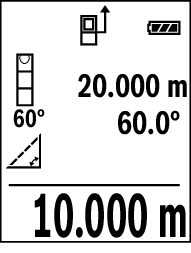
With indirect height measurement, you can determine distance AB by measuring distance 1. The measuring tool calculates the required height AB from angle  and distance 1.
- Press button (7) to open the Functions menu.
- Select indirect distance measurement
 and confirm the selection with the (7) button.
- Select indirect height measurement
 and confirm the selection with the (7) button.
- Briefly press button (2)
 to switch the laser on.
- Place the measuring tool at the height of the lower measuring point B.
- Tilt the measuring tool so that the laser is pointed at the upper measuring point A.
- Press button (2) to start the measurement.

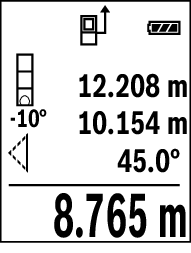
After the measurement has been completed, the height will be calculated automatically and shown at the bottom of the display. The measured values for distance 1 and angle appear above it.
Double Indirect Height Measurement
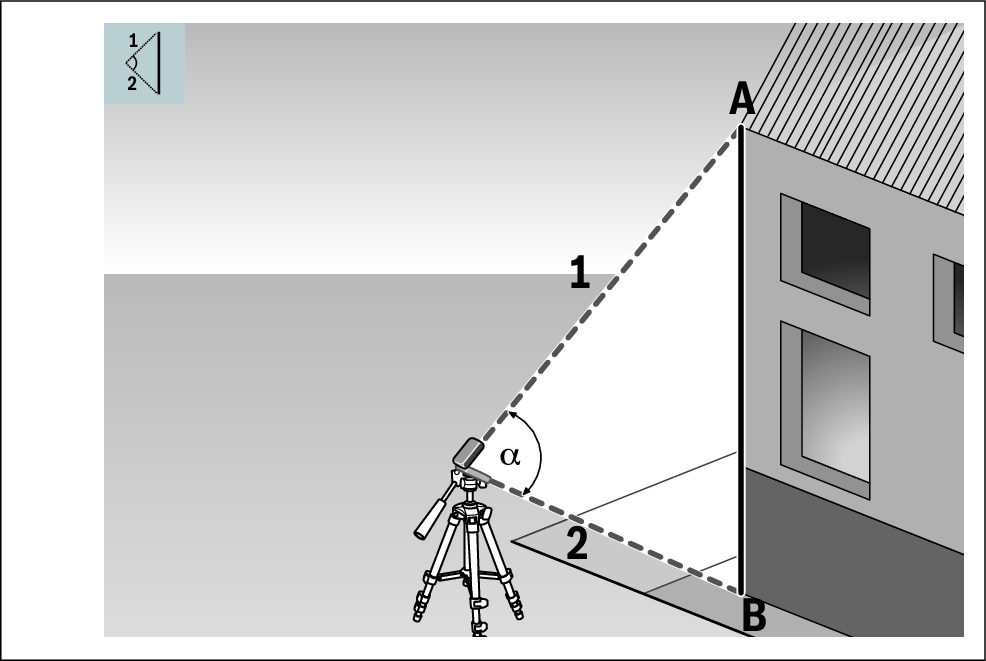
With double indirect height measurement, you can determine distance AB by measuring distances 1 and 2. The measuring tool calculates the required height AB from angle and distances 1 and 2.
- Press button (7) to open the Functions menu.
- Select indirect distance measurement and confirm the selection with the (7) button.
- Select double indirect height measurement
 and confirm the selection with the (7) button.
- Briefly press button (2) to switch the laser on.
- Tilt the measuring tool so that the laser is pointed at the upper measuring point A.
- Press button (2) to start the first measurement.
- Tilt the measuring tool so that the laser is pointed at the lower measuring point B. Do not change the position of the measuring tool when doing so.
- Press button (2) to start the second measurement.
After the measurement has been completed, the height will be calculated automatically and shown at the bottom of the display. The measured values for distances 1 and 2 and angle appear above it.
Indirect Length Measurement
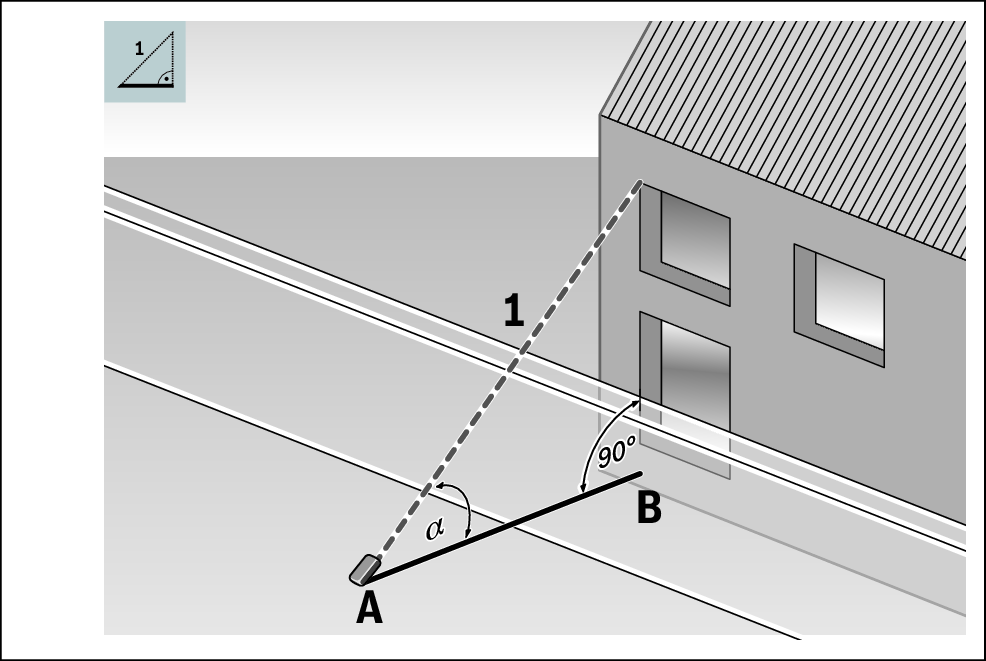
With indirect length measurement, you can determine distance AB by measuring distance 1. The measuring tool calculates the required length AB from angle and distance 1.
- Press button (7) to open the Functions menu.
- Select indirect distance measurement and confirm the selection with the (7) button.
- Select indirect length measurement
 and confirm the selection with the (7) button.
- Put the measuring tool on the starting point A of the required distance AB.
- Tilt the measuring tool so that the laser is aligned with the level of end point B.
- Press button (2) to start the measurement.
Once the measurement is complete, the result for the required distance AB will be shown at the bottom of the display. The measured values for distance 1 and angle appear above it.
Wall Area Measurement

The wall area measurement is used to determine the sum of multiple individual areas with a common height. The requirement for a correct area calculation is that the first measured length (for example the ceiling height H) is identical for all sub-areas. In the illustrated example, the total area of several walls that have the same ceiling height H but different lengths L is to be determined.
- Press button (7) to open the Functions menu.
- Select wall area measurement
 and confirm the selection with the (7) button.
- Measure the ceiling height H as for a length measurement.
- The measured value is displayed in the top measured-value line. The laser remains switched on.
- Afterwards measure the length L1 of the first wall.
- The area will be calculated automatically and shown at the bottom of the display. The last measured value for length can be found in the bottom measured value line (d). The laser remains switched on.
- Now measure the length L2 of the second wall.
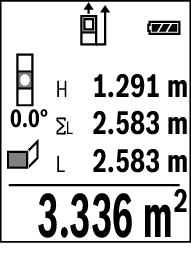
The individual measured value displayed in the measured value line (d) is added to the length L1. The sum of the two lengths (displayed in the middle measured value line (d)) is multiplied by the saved height H. The total area value is shown in the result line (e) at the bottom of the display.
You can measure any number of lengths LX, which will be automatically added and multiplied by the height H.
Stake-Out Function
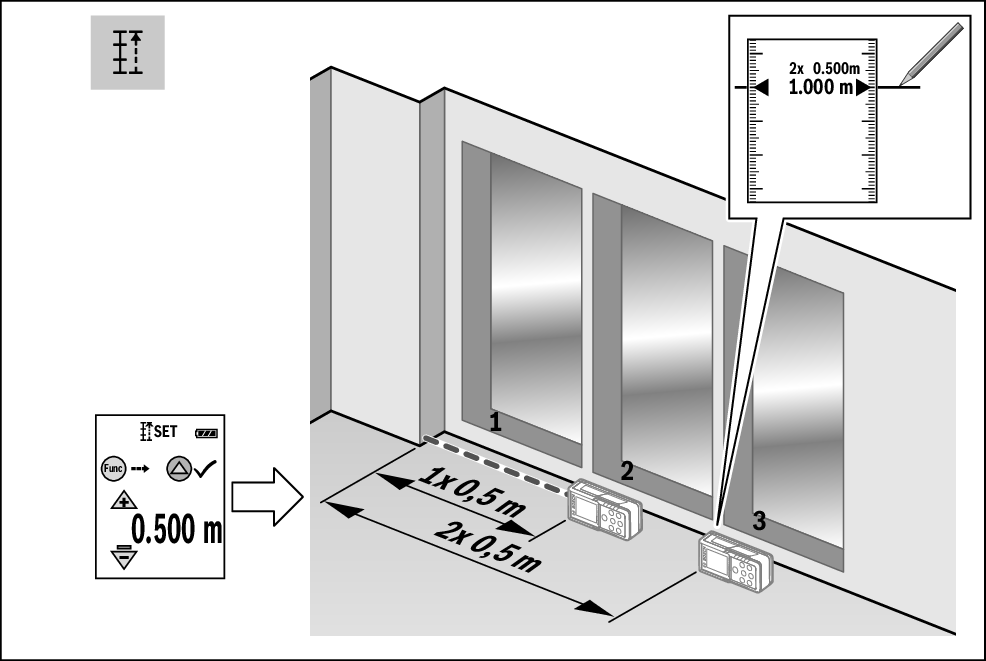
The stake-out function repeatedly measures a defined length (distance). These lengths can be transferred to a surface, for example to enable material to be cut into pieces of equal length or to install stud walls in a drywall construction. The minimum adjustable length is 0.1 m and the maximum length is 50 m.

- Please note that the distance from the marking is shown in the display in the stake-out function. The reference is not the edge of the measuring tool.
- Press button (7) to open the Functions menu.
- Select stake-out function
 and confirm the selection with the (7) button.
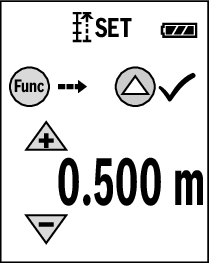
- Set the required length.
- Select the corresponding digit/position with the (7) button and change the value with the (3) button or (8) button.
- Press the (2) button to start the stake-out function and slowly move away from the starting point.
- The measuring tool continuously measures the distance to the starting point. The defined length and the current measured value are thereby displayed. The lower or upper arrow displays the shortest distance to the next or previous marking.
- You can also set a measured value as a defined length by pressing the (4)
 button.
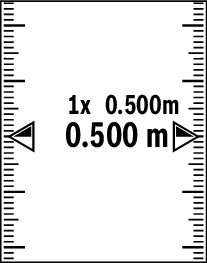
The left factor specifies how many times the defined length has already been reached. The green arrows on either side of the display indicate the reaching of a length for marking purposes.
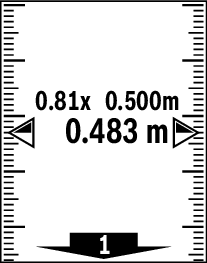
Red arrows and red text indicate the actual value when the reference is outside the display.
Grade Measurement/Digital Spirit Level
The digital spirit level is used to check the alignment of a surface. Grade measurement is used to measure a slope or incline (e.g. of stairs, railings, when fitting furniture, laying pipes, etc.). The measuring tool automatically switches between the two functions when you change the position of the measuring tool.
- Press button (7) to open the Functions menu.
- Select grade measurement/digital spirit level
 /
/ and confirm the selection with the (7) button.
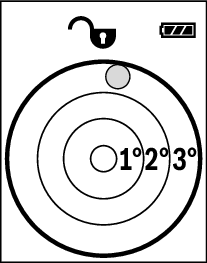
- To use the digital spirit level, place the measuring tool with the rear side on the surface to be measured.
When the inclination exceeds 3°, the ball in the display lights up red.
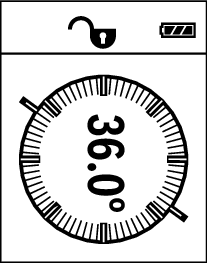
- To use the grade measurement, place the measuring tool with one side on the object to be measured.
You can save the measured value by pressing the (2) button.
Memory Function
The value or end result of each completed measurement is automatically saved. The last 30 values (measured values or end results) will be saved. If the memory is full, the oldest value will be deleted. The oldest value is located in position 1 in the memory, while the newest value is in position 30 (when 30 memory values are available).
- Press button (7) to open the Functions menu.
- Select the memory function
 and confirm the selection with the (7) button.
- The last value will be displayed.
- Press the (3) button or (8) button to browse through the saved values.
The number of the memory value is shown at the top of the display, and the symbol of the corresponding measuring function is shown on the left. If there is no value available in the memory, "0.000" is shown at the bottom of the display and "0" at the top.
Deleting Memory
- Press button (5)
 to delete the displayed value.
- To delete all values in the memory, press button (4) and button (5) at the same time.