Starting Operation of the rotary laser
- Keep the work area free from obstacles that could reflect or obstruct the laser beam. For example, cover any reflective or shiny surfaces. Do not measure through panes of glass or similar materials. The measurements may be distorted by a reflected or obstructed laser beam.
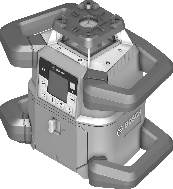
Horizontal position
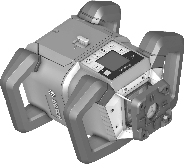
Vertical position
Position the measuring tool on a stable surface in the horizontal or vertical position, mount it on the tripod (43) or on the wall mount (44) with the alignment unit.
Due to its high levelling accuracy, the measuring tool is very sensitive to knocks and vibrations and changes in position. Take care, therefore, that the measuring tool is stable to avoid interruptions to the operation caused by relevelling.
The main functions of the measuring tool are controlled by the buttons on the measuring tool and the remote control (40). Additional functions are available via the remote control (40), the laser receiver (41), or via the Bosch Levelling Remote App see Overview of control options for the functions.
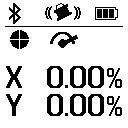
For the indicator on the measuring tool's display (15), the following applies:
- The current settings for this function will be indicated when a function button (e.g. the line operation button (5)) is pressed for the first time. The settings will be changed the next time a function button is pressed.
- In the lower part of the display, softkey symbols (i) are shown in various menus. The corresponding function keys (softkeys) arranged around the display can be used to execute the functions represented by the symbols (i) (see figure B). Depending on the corresponding menu, the symbols show the usable function buttons (e.g. the rotational operation button in the rotational operation menu (6)) or additional functions such as Next (
 ), Back (
 ) or Confirm (
 ).
). - The softkey symbols (i) also make it easy to recognise whether the Slope button down/Button for clockwise rotation (3) and Slope button up/Button for anticlockwise rotation (4) buttons in the current menu are used to slope downwards (▼) or slope upwards (▲) or to turn in a clockwise (
 ) or anticlockwise (
 ) direction.
 - The display will automatically go back to the start screen five seconds after the last press of a button.
- The display (15) will light up with every press of a button or signal that reaches the measuring tool. The light will go out approximately one minute after the last press of a button.
Tilting or rotation in various functions can be accelerated if the respective tilting or rotation buttons on the measuring tool or the remote control are held down for longer.
All functions are reset to their standard setting when the measuring tool is switched off.
Note: After the first time the tool is started up and before beginning work, you should always perform an accuracy check see Accuracy Check of the Measuring Tool.
To switch on the measuring tool, press the on/off button (11). A start sequence will appear for a few seconds, followed by the start screen. The measuring tool emits the variable laser beam (8) and the upwards plumb point (10) from the outlet apertures (9).
- Do not direct the laser beam at persons or animals and do not stare into the laser beam yourself (even from a distance).
The levelling starts automatically and is shown by the flashing symbol for levelling in the display, the flashing laser beams and the status indicator (12) that is flashing green see Automatic Levelling.
After levelling has successfully been completed, the start screen will appear, the laser beams will light up continuously, rotation will start and the status indicator (12) will light up green continuously.
- Never leave the measuring tool unattended when switched on, and ensure the measuring tool is switched off after use. Others may be blinded by the laser beam.

To switch off the measuring tool, press and hold the on/off button (11) until the switch-off symbol appears on the display.
If the maximum permitted operating temperature of 50 °C is exceeded, a warning message will appear for a few seconds and the status indicator (12) will flash red.
The measuring tool will then shut down in order to protect the laser diode. Once it has cooled down, the measuring tool is operational again and can be switched back on.
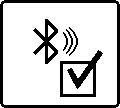
In the default factory setting, the measuring tool and the remote control (40) and laser receiver (41) supplied are already connected via Bluetooth®.
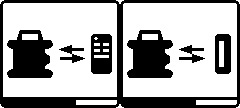
To connect the remote control or the laser receiver, press and hold the Bluetooth® button (7) until the symbol for establishing a connection with the remote control/laser receiver appears on the display.
To establish a connection to the remote control, press and hold the button for anticlockwise rotation (29) and the button for clockwise rotation (36) on the remote control at the same time until the status indicators (33) and (34) begin to flash. While the connection to the remote control is being established, the status indicators on the remote control will alternately flash green.
To establish a connection to the laser receiver, press and hold the X‑axis and Y‑axis buttons on the laser receiver at the same time until the message that a connection has been established appears on the display of the laser receiver. To do this, consult the operating instructions for the laser receiver.

It will be confirmed on the display whether a connection has successfully been established to the remote control or the laser receiver.
If the attempt to establish a connection to the remote control is successful, the status indicators (33) and (34) on the remote control will light up green for 3 s.
If no connection could be established, an error message will appear on the display.
If the attempt to establish a connection to the remote control is not successful, status indicators (33) and (34) on the remote control will light up red for 3 s.
Two laser receivers can be connected to and work with the measuring tool at the same time.
If other remote controls or laser receivers are connected, the oldest connection will then be deleted.
The measuring tool is equipped with a Bluetooth® module which uses radio technology to enable remote control via a smartphone with a Bluetooth® interface.
The Bosch Levelling Remote App application (app) is required to use this function. You can download this in the app store for your terminal device (Apple App Store, Google Play Store).
Information about system requirements for a Bluetooth® connection can be found on the Bosch website at www.bosch-pt.com.
When remote controlling via Bluetooth®, poor reception conditions can cause time delays between the mobile terminal device and the measuring tool.
The Bluetooth® function is switched on by default.
To switch off Bluetooth® to control remotely via the app, press the Bluetooth® button (7). The Bluetooth® connection indicator (b) will go out on the start screen.
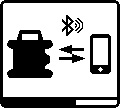
To switch back on Bluetooth® to control remotely via the app, briefly press the Bluetooth® button (7). The symbol for establishing a connection to the smartphone will appear on the display.
Ensure that the Bluetooth® interface is activated on your mobile device.
It will be confirmed on the display whether a connection has successfully been established. The existing connection is visible on the Bluetooth® connection indicator (b) on the start screen.

If no connection could be established, an error message will appear on the display.
The connection between mobile end device and measuring tool is established after the Bosch application has started. If multiple active measuring tools are found, select the appropriate measuring tool. A connection will be established automatically if only one active measuring tool is found.
The Bluetooth® connection may be interrupted if the distance between the measuring tool and the mobile device is too great or is blocked, and if there are any sources of electromagnetic interference. In this case, another attempt to establish a connection will automatically begin.
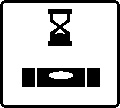
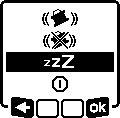
During breaks from work, you can set the measuring tool to sleep mode. All your settings will still be saved.
To switch on sleep mode, briefly press the on/off button (11). In the menu which subsequently appears, press the on/off button (11) as many times as needed until sleep mode has been selected. Confirm your selection with by pressing the slope button (14).
Alternatively, you can switch on sleep mode by pressing the sleep mode button (27) on the remote control.

When sleep mode is switched on, the sleep mode symbol will be indicated on the display. The status indicator (12) will slowly flash green. The shock-warning function will remain activated and all settings will be saved.
To switch off sleep mode, briefly press the on/off button (11) on the measuring tool or press the sleep mode button (27) on the remote control.
You can also switch off the measuring tool while it is in sleep mode. Press and hold the on/off button (11) until the switch-off symbol appears on the display. All other buttons on the measuring tool and the remote control will be deactivated.
It is also possible to switch sleep mode on and off via the Bosch Levelling Remote App.
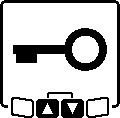
The keyboard of the measuring tool and the remote control can be locked via the Bosch Levelling Remote App. The keyboard lock symbol will appear on the measuring tool's display.
The keyboard can be unlocked as follows:
- via the Bosch Levelling Remote App,
- by switching the measuring tool on and off via the on/off button (11)
- or by pressing the ▲/ (4) and ▼/ (3) buttons on the measuring tool at the same time.